
Pond by Everything Fishy
Telephone: 817-293-1782. Email us
|
|
Pond by Everything FishyTelephone: 817-293-1782. Email us |
| Yes, we're still alive, and we will be running spring cleanups starting almost immediately. (Today is Feb 27th, 2009.) When Everything Fishy dropped off the planet in early February we went to Mineral Wells, Texas to rebuild a pair of ponds. Photos and work, February 2009. |  The old bottom pond, tiny, with a giant waterfall towering over it. Iron is embedded in the mortared falls. Tearing this out
might structurally damage the deck, top pond, etc. So we would have to work around it. Click for larger image in new window
The old bottom pond, tiny, with a giant waterfall towering over it. Iron is embedded in the mortared falls. Tearing this out
might structurally damage the deck, top pond, etc. So we would have to work around it. Click for larger image in new window
|
| The pair of ponds we were over-hauling were going to be a challenge, and Mineral Wells is outside our service area, so the job had to be scheduled in our slow time. We have one more day's work before it is finished, and final photos can be taken. |
 The old top pond. A wooden box with concrete
and iron mesh sides. The old top pond. A wooden box with concrete
and iron mesh sides. |
| Rebuilding the top of the old falls. |  Click for larger image in new
window.
Click for larger image in new
window. |
| The plumbing that makes it all work, and the guy who put a lot of it together. Pump: ShinMayWa 1/3 HP, pushes over 4000 gph, gravity switch turns it off if pond water gets too low. Part of the water is diverted to circulation fountains to keep the temperature cool in summer. This is a very hot, dry location. Filter Oase Biotec 18 Screenmatic, top of the line for super easy maintenance. Oase lighting. A small Oase pump divides its flow between the mini falls to the left of the old waterfall, and the old waterfall itself. On off valve for the old waterfall is reachable from the deck. It should not be run until the old mortar is sealed, so it is off for now. |  Click for larger image in new
window.
Click for larger image in new
window. |
| Mini-falls on back wall hides a partial water return from the top pond, and water from the pump that will drive the old falls once they are properly sealed. Lower pond can run independent of the top while the exterior walls of the box are being finished. Plumbed to run direct to the filter instead of going up with the turn of 2 valves. |  Click for larger image in new
window.
Click for larger image in new
window. |
| Another company will be finishing the exterior of the boxes, we put a couple of pieces of silvermist in position, as I believe that is what they will be finished with. The front falls have just been foamed, so we can't turn the water on. They were narrowed to allow a sheet of water (rather than 'beaded' flow) without exceeding the small capacity of the trough on the deck, its size being limited by homeowner requirements. | 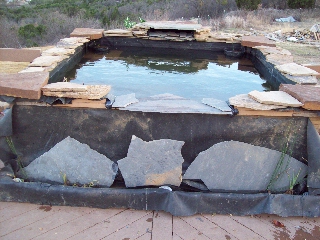 Click for larger image in new
window.
Click for larger image in new
window. |
| Plumbing runs under the deck. Two 1 1/4 inch bulkhead fittings and one 2 inch bulkhead are dropped through the trough to pipes under the deck. Each smaller line runs to one side of the pond, with flow from the 2 inch t-d in to both. | 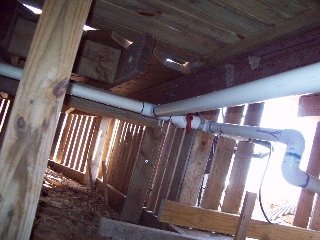 Click for larger image in new
window.
Click for larger image in new
window. |
| Excess flow from the pump is controlled by an in the water ball valve, recirculating and aerating the hot, southwestern side of the pond. In time the lilies will hide the pipes. Additionally, three easy to reach valves control whether or not water goes up to the top pond at all, or simply recirculates to the bottom pond through the filter. The pump must be turned off before switching flow pattern. | 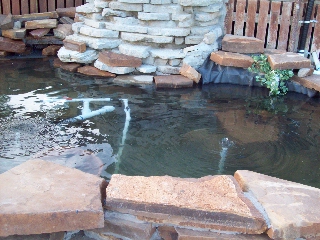 Click for larger image in new
window.
Click for larger image in new
window. |
| Finally done adjusting pipe heights, and topping off the pond. 4 fountains barely touching the surface add aeration when this pond is full. Because the location is very windy, a greater height causes too much evaporative water loss. | 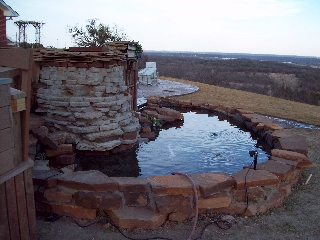 Click for larger image in new
window.
Click for larger image in new
window. |
| Filter box doesn't have line plumbed to the cleanout yet, but the electrical isn't in either. We'll catch that on the final tidy-up. | 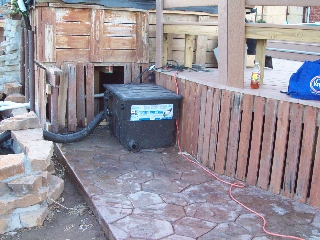 Click for larger image in new
window.
Click for larger image in new
window. |
| Looking down from the deck into the bottom pond, March 5 2009. | 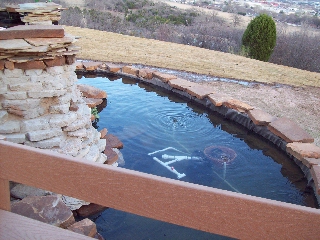 Click for larger image in new
window.
Click for larger image in new
window. |
| A final view until the plants sprout out and the top pond's trough is built, whenever that may occur. We will be applying sealant to all mortar - Everything Fishy's Ultimate Stone Sealant, to help keep it from leaching lime into the water. But the sealant application is at least 2 weeks off, after the mortar cures. By that time we should get some nice pics that include plants. (The pipes sticking out of the ground are markers for the sprinkler system installers - where we cut the old damaged system off, so they know where to dig for pipes.) | 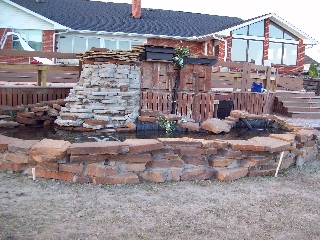 Click for larger image in new
window.
Click for larger image in new
window. |
| The guys who helped make it happen, and broke the wheelbarrow. (It was time for a new wheelbarrow anyway.) |  Click for larger image in new
window.
Click for larger image in new
window. |
Click to return to pond photos page
Aquatics information, photographs, articles Copyright © 1999 to 2013 by Alice Burkhart, All Rights Reserved.